How to insert an image into a shape in Illustrator? (A Clipping mask tutorial)


To insert an image or artwork into a shape (in Illustrator) requires a tool/technique called 'clipping'. Clipping doesn't really 'clip' off an image, instead it masks other parts of the image/artwork so that the only parts visible are the ones inside your clipping mask.


Another great thing about clipping masks is that your image isn't damaged in any way so you can still edit which part of the image you want to show through the clipping mask.

For this tutorial, we are going to use the letter 'O' in the word 'Adopt Me' and clip it to an image of a puppy.

1. Pick a font to your liking and use the type tool ( T ) to type in 'Adopt Me'.
I'm using 'DayPosterBlackNF' from 1001fonts.com. It's free for commercial use.

2. Change the text 'Adopt Me' into a group of compound paths.
Select your text. Go to Object>Expand. The expand panel will pop up. Click OK for now.


The text 'Adopt Me' has now changed from 'text' property into a group of 'compound paths'. Right-click and ungroup them. Now just select the letter 'O' and right-click. Choose the option release compound path. Now your work should look like this. The 'hole' in the middle of the 'O' has become a compound path on its own.

Now, just select the rectangle and delete it.


3. Let's start clipping.
Prepare your image. I googled 'puppy' and got this picture. Awww... don't you just wanna adopt it?


Save the image into your desktop and drag it into your illustrator and into your workspace. Should the image be above the letter 'O' in your work, open your layer panel Windows>Layers or press F7.


Your layers should consist of the image of the puppy and the compound paths of the word 'Adopt Me'. Now you need to click on the image layer and drag it under the letter 'O's layer. Your work should look like this now.


Select both the image and the letter 'O'. Right-click and select Make Clipping Mask. And you did it!


But wait! I think the puppy needs a bit of an adjustment. Select the image of the puppy and right-click. Select Isolate Selected Clipping Mask. You'll notice that the areas outside the puppy are lightened.


You can now click on the puppy and move it around. Once you're satisfied with the position, just right-click on anywhere and select Exit Isolation Mode.


Now that you know how to clip-mask an image, have a go with other types of fonts and images.

How to make a folded paper heart in Illustrator

Hi everyone! Previously, I made a tutorial on how to make a custom love shape in Illustrator. This time, I'm going to show you how to take it a step further by adding gradient.

1. Create a heart shape.
Read here if you are new to creating a heart shape. Don't worry about the color of the heart yet. We will deal with this once we get into Step #3 onward.

2. Make a copy of a half-heart.
Click Ctrl+R to bring out the ruler. 'Pull-out' a guideline. Select both the guideline and heart. Click Shift+F7 to bring out your align panel. Click Horizontal Align Center, second button from the left on the top row. This will align your guideline to the middle of the heart.


Click on the rectangle tool (M). Make a rectangle on top of the right half-side of the heart. Click on guideline to guide you. This will ensure your rectangle is over the right half-side of your heart. Make sure you cover all of the right half-side.


Click on Selection Tool (V). Click on the left half-side of the heart. This selects the heart that was on the bottom of the rectangle. Make a copy, Ctrl+C then Ctrl+F. With the copy of the heart still being selected, click and hold shift while clicking on the rectangle. This selects both the heart copy and the rectangle. Bring out your Pathfinder again (Shift+Ctrl+F9) and press Intersect, which is the third button from the left on the top row.


3. Prepare the swatch for the gradient.
By now, you can delete the guideline. Just select it and press delete.

Click on the swatch panel. By default, your swatch looks like this in RGB mode.


To use the color I am using for this tutorial, click the 'New Group Color' button that looks like a folder at the bottom. Click OK for now.


The red that I'm using for my heart is D32F3C or R=211, G=47, B=60. Double click the Fill and fill in the code. Click OK. Click on the Fill and drag it into the New Group Color.

Now double click the Fill again. This time we're going to pick a darker shade of red. The one I picked is BF2235 or R=191, G=34, B=53. Click OK. Click on the Fill and drag it into the New Group Color.

Your swatch should look like this now.


Select the whole heart and fill it with the first red, D32F3C.

4. Prepare and add the gradient.
Bring out the gradient panel (Ctrl+F9).

To make them both the gradient panel and the swatch panel active at the same time, drag them out into the artboard.

Click on the half-heart to activate it. Now click on the gradient slider. Notice you have two small sliders.


Drag your first red D32F3C from the new color group into the right slider. Then drag your darker shade of red BF2235 into the left slider.


Click on your right slider to activate it. Now change the location of the slider to 50%.


And you're done!

5. Adding shadow. Optional.
To give some depth to the heart, select the whole-heart. Make a copy, Ctrl+C then Ctrl+F. Change the color by clicking onto any color you like. I'm picking a light grey, K=20.


Bring it backward by using (Ctrl+[ ). Use your down button and move the shadow a little downward. Give it about 4 or 5 taps.

And you're done!

Happy Valentine's Day everyone!

How to make a custom love shape in Adobe Illustrator


Hi everyone. Valentine's Day is just around the corner. Here's a little beginner's tutorial about making a custom love shape in Adobe Illustrator using the ellipse tool, pen tool, align panel, reflect tool, guidelines and the pathfinder tool. 

In this tutorial, basically, we're going to make one half of the heart first and then later we are going to make a copy of it, flip it horizontally, stick them together, make a few minor adjustments and finally getting your very own custom love shape. I'll start this tutorial off with the assumption that you've known how to open a new file, picking colors for your fills and strokes and selecting objects.

Let's begin!

1. Make a circle. 
Click on the ellipse tool (L). If you want to make a perfect circle, hold onto Shift while making the circle. Now, we'll need the help of our ruler. Click Ctrl+R/Cmd+R and you will see the ruler around your artboard.


2. We need a vertical guideline to align with the circle.
To do this, click and hold onto the vertical side of the ruler and 'pull out' a guideline. Next, open your Align panel (Shift+F7). We're going to align it to the left side of your circle with the Horizontal Align Left button. That's the first button on the left on the top row.

Select both the guideline and the circle.

When not selected, the guideline is light green.
When selected, the guidelines becomes blue
Now, click the Horizontal Align Left button.


3. Draw the bottom part of the half-heart.
With the guideline and the circle still selected, click the pen tool (P). Now click onto the left anchor point (marked A in picture) of the circle. Next, click onto the right anchor point (marked B) of the circle while holding shift. Don't worry if it's not exactly on the right side of the circle. After that, click on somewhere slightly further than the bottom part of the circle while holding shift (marked C).


Now comes the fun part. Pay attention. We're going to make a curve.

Now, click onto the starting anchor point but don't let go just yet. After you've clicked onto the starting point, pull away from the point. You'll see one control line appearing from your starting anchor point. So long as you did not let go of the point, you are in control. So just play around with it and see what seems fit to your taste. Once satisfied, let go of the mouse button.


4. Combine both shapes.
Select both shapes and then press Unite from the pathfinder panel.


Voila! A half of a heart. You can make the guideline disappear by selecting it and pressing 'delete'. Now let's make a whole heart.

5. Make a copy of the half-heart.
Click on it and copy it by pressing Ctrl+C and then pasting it with Ctrl+F. Now double-click on the Reflect Tool. This prompts the reflect tool options panel. Click on vertical. Click OK.


6. Arrange both half-hearts.
Pull the flipped half heart to the right. You can try arranging both of them to make a perfect heart by zooming in real close or you can try this method. Make them overlap like this.


Then select both of them and then click on the pathfinder Divide tool which is the first left button on the bottom row.


Right-click on your heart and click 'ungroup'. Click on the unwanted pieces - the two triangles at the bottom and delete them.


Select the (broken) heart pieces and now click on the pathfinder Unite tool.
And you're done!

So that's how I make my custom love shape. The reason why I overlap my hearts and use the Divide tool is to avoid lots of anchor points at the pointy shape of the heart. I mean, sure you can zoom in all you want but I find that this way I didn't even need to worry about the point. They can be such a pain when you need to design one with an outline.

I hope you enjoy this tutorial. Do visit my other (upcoming) tutorials and if ever need any help, just drop me a comment. Thanks for reading this. Bye!

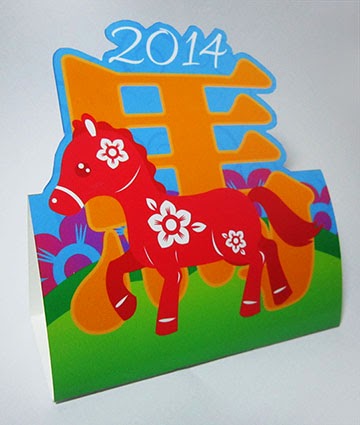
Chinese New Year 2014 - the year of the horse.

Happy Chinese New Year to all. I have made plans to print these ponies and giving them out to friends and family but procrastination got in the way. Oh well, better late than never. Gong Xi Fa Cai! Giddy-up!


Newer Page Home
Related Posts Plugin for WordPress, Blogger...